Introduction
Content
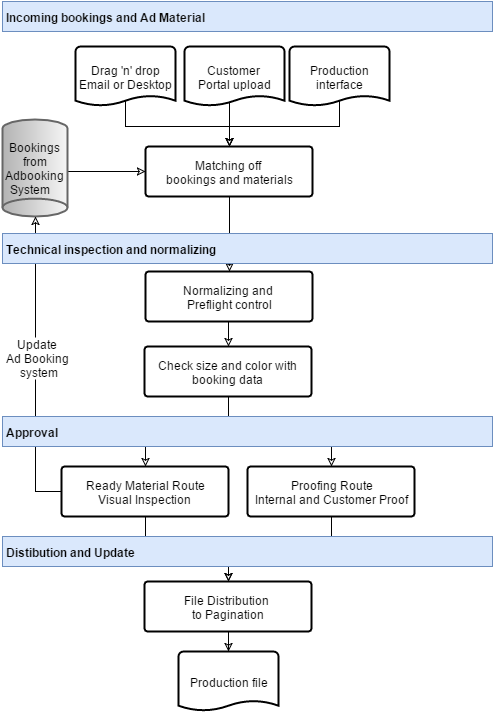
ADPOINT Workflow
Workflows incorporate the basic functionality of a flexible and stable workflow solution. Ads and assets are picked up through hot folders, ftp-uploads or simply dragged into the workflow from your desktop. Using ADPOINT plugins for production a menu in Indesign saves and registers the material and assets in ADPOINTt.
Through the connection to the ad booking system, ads are identified and linked to the correct booking. Through this link ads can be controlled for size and information about insertion date, publication and production enables ADPOINT Workflow to route ads through the quality control workflow.
Built in normalization, preflighting and pre-ripping ensures that all technical aspects of running the ad are revealed for optimal quality assurance. And a single window displays all relevant tracking information for each job down to every historic detail.
ADPOINT Workflow incorporates the Adobe PDF Library for normalization, preflight and conversion of PDF and EPS file formats offering the highest level of compatibility with industry standards. Support for Flash files and streamed data make ADPOINT Workflow a one-stop solution for all advertising needs.
Track and Control of ads
For each version of the ad, all tasks can be easily monitored. The current and previous status of the ad file are listed here, and since all actions are time stamped and marked with version and username, it is very easy to track ads down to any level of detail.
Technical documentation and logs is also available in this window. No more opening of log files from other system and no more querying of external databases.
The ad tracking window can be tailored to display exactly what is needed – no more, no less. This gives the best possible overview and allows system operators to monitor exactly what is happening with each ad in a simple and easy to overview window.
Booking and Traffic
ADPOINT is connected to the adbooking system. As soon as an order is created or updated in adsystem it appears in ADPOINT with a small delay. All data that is relevant for production, traffic and communication with relevant parties are available to ADPOINT users such as sales, traffic, production team, approval.

Essential data is shown for user in the overview. A lot more is available when needed
Customer is shown in list for reference but also customer contact information is available.
Internal contact information, salesrep, booker, producer
First publicatindate and publications, size and color.
Proofing method or production method, reeady material or production ad
Pick up admaterial or production documents from existing ad
…
As a rule of thumb the adbooking system should provide as much data to ADPOINT as possible. In some cases installations is not possible or wanted. Some attributes to the boking can be changed or generated in Adpoint, manually or automatically. Production method manually as an example, deadlines for admaterial and proofing automated.
All of this booking data can be filtered to create lists of ads that are relevant to users function and activity. For example:
Ads booked for next three days for NN & YY publications expected as ready material
Ads to be prepared for production with assets and all relevant information
A filter to see ads ready for production
Ads to be approved or annotated internally or by customer
Ads to be corrected
Full list of a specific publication/issuedate
…
Filters are easily created on the fly or can be saved and shared with usergroups. A saved filter can be changed on the fly to show another publication, more days ahead, different status and so on.
Preparing Production Ads
When booking appears in ADPOINT production ads are ready to be prepared and released for production. This involves ensuring that all information and assets are assigned to the booking and that deadlines, production site, proofing method and deadlines are correct. Reference to previously produced ad(s) to be used as starting point for the new ad.
Sending Asset request to customer. Asset may be graphical files and textfiles with manuscript, rough and so on.
Drag ‘n Drop assets from desktop or from an email
Retrieving assets from the DAM module – assets allready registered in ADPOINT are easily found based on customer and previous ads or from ClipArt.
Pick up information – previously produced ad. This can be picked up to the new booking either manually or automatically triggered from Ad booking system.
Reference to customer layout template.
Proofing method. Which proofing route to follow, Internal proof / Customer proof or both

Change status to release for production
When everything is ready status is changed to “To be produced” and the job proceeds into producers route.
Print Ad Production
Status Ready for production indicates that all information and assets are assigned to the booking and that deadlines, production site, proofing method and deadlines are correct. Reference to previously produced ad(s) to be used as starting point for the new ad.
Open details view and review this information in the tabs for order, assets and notes. Perhaps some assets need to be worked, adding clipping path, scaled. This can be done directly from ADPOINT with plugins for Photoshop and Illustrator.
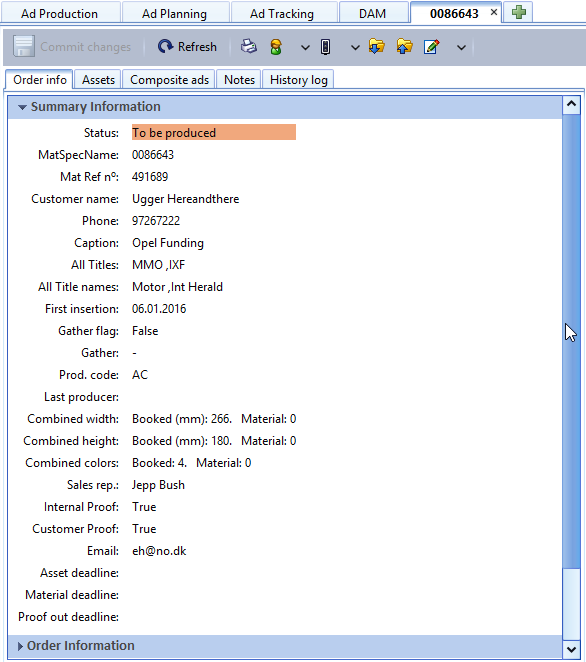
Details view holds all information about the job in tabs
When ready the producer creates a new Indesign job with the booked size by clicking on the pencil icon in the toolbar or from functions menu.
Status in ADPOINT changes to Work in progress and the job is locked for other users and the producers is registered as current Producer.
In Indesign an ADPOINT menu is available, offering functionalities to save and export the job back to ADPOINT. This plugin also keeps a live thread open allowing to Drag n’ Drop assets directly from ADPOINT to InDesign.
Besides what is assigned to the job being worked all assets in ADPOINT are easily retrieved in the DAM module.
Assets from users desktop can also be placed in InDesign and will be automatically registered when document is saved.
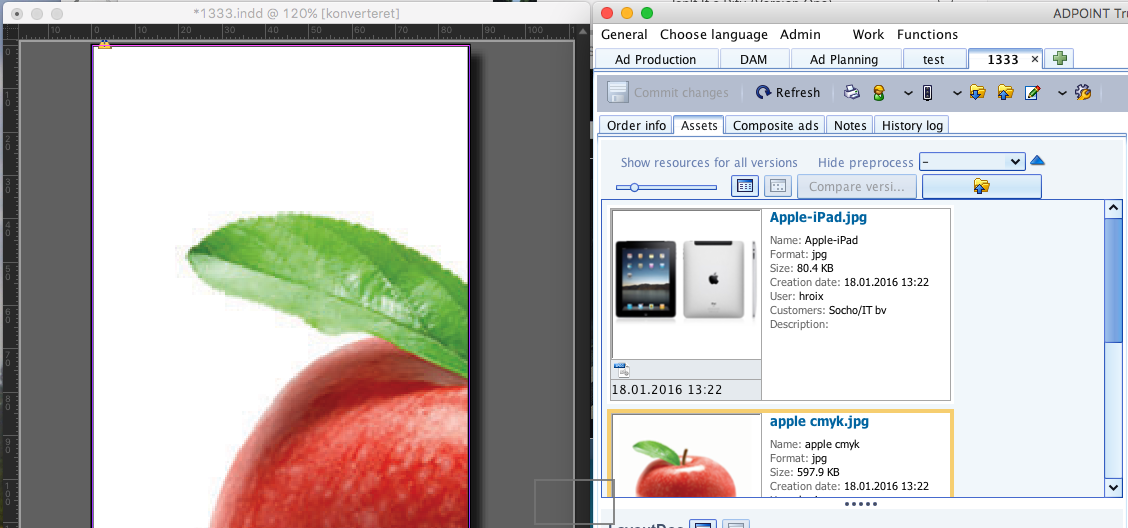
Drag n’ drop directly from ADPOINT into InDesign
When the InDesign job is ready for proofing Save & Export from ADPOINT plugin performs
Export PDF with the joboptions specified
Saves the InDesign document
Registers all assets used in document
The PDF passes through technical workflow and is soft-ripped for preview and proofing
Status changes to the workflow step defined, typically Internal Proof – progressing the job to proofing route.
If job is annotated with corrections status Need correction will tell and the job is opened for edit by using the pencil icon tool again.
There many functions available to support daily tasks. All described in detail under Functions.
Proofing Route
The proofing and approval route in ADPOINT usually flows through stages according to the proof flags set on the job. Either Internal Proof or Customer Proof – or both.
When new ad material is processed on the job without errors ADPOINT the job goes into the appropriate status according to the proof flag.
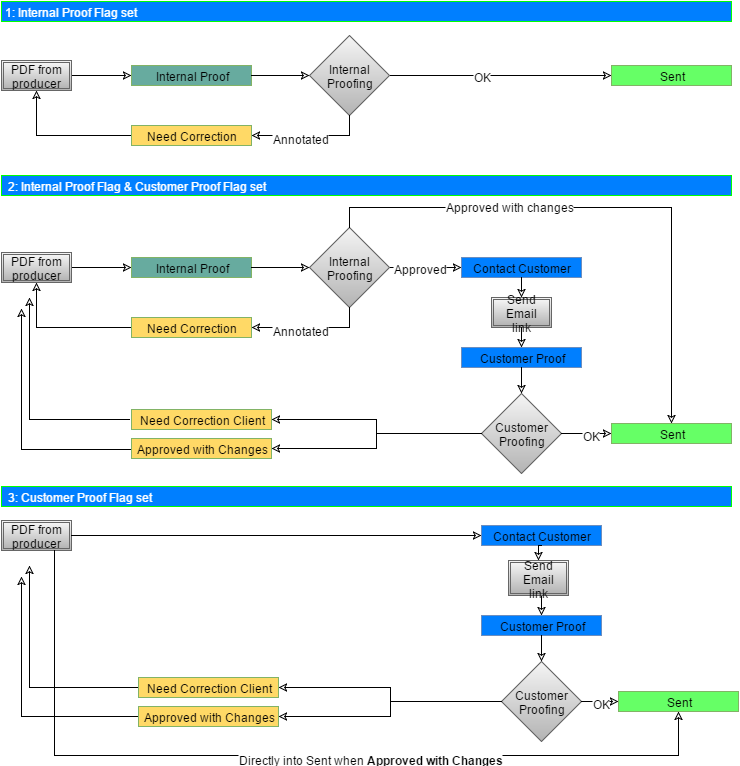
Internal Proofing
Double click ad in List View to open the job in Details view. This offers a preview of the ad, a tab showing annotations as they are created and a set of annotation and approval tools.
Print ad previews you see here is a real Print Preview consisting of the print plates on top of each other. You can see the plates individually. The preview will show you problems with fx “overprint” that you would not see in a PDF on screen or printed.
Ad a “Yellow Poster” to ad text, “Highlight” to request reformatting, a “Frame” or a “Pin”. Drag ‘n Drop a new asset to a position in the preview and a pin is automatically created with a note on which asset to position at pinned position.
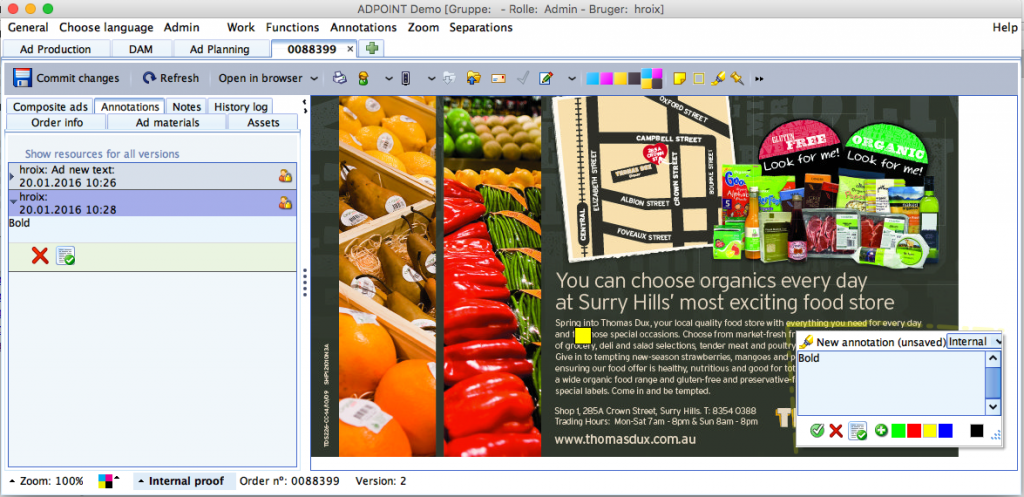
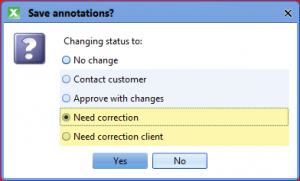
When annotations are all registered click Commit Changes and you will have a choice to accept the default status Need correction or choose another status from the list.
Producer will see the job that needs correction, see the annotations and do the corrections in InDesign. If there are many annotations in a complex ad ticking the “Mark as completed” tag. User can toggle to see these or not in the annotations list.
Producer corrects what is annotated and sends in a new version of the job which then goes into status Internal Proof once more. This time we assume that the ad passes Internal QA. Clicking the green approve icon progresses the ad in the workflow. Status is changed to Contact Customer. Email is often sent by clicking the email icon and open the template to send proof request.
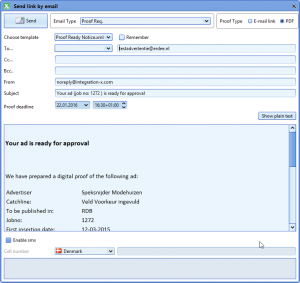
The email is automatically filled with customer proof contact and information about the ad, what to do, deadline for approval and who to contact in case of any problems.
Customer Proofing
Customer recieves the email and opens a preview of the ad in any internet browser.
Here the customer has allmost the same tools and information as in the internal ADPOINT.
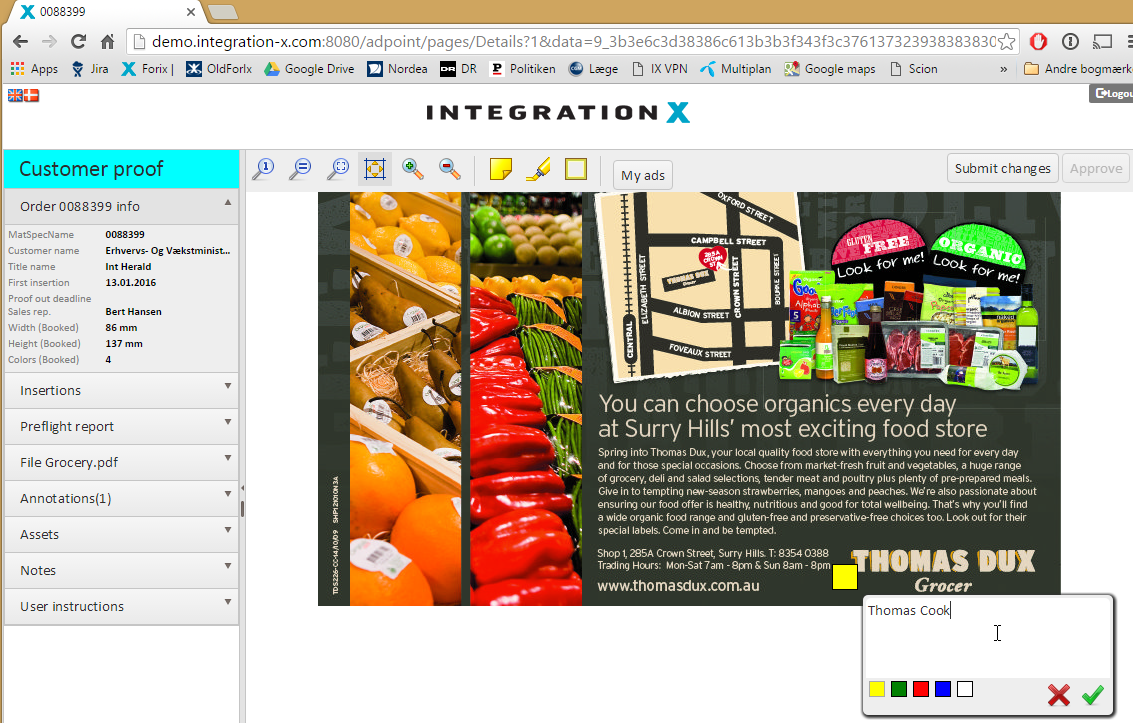
Customer approves or annotates the ad – and the job follows the workflow as illustrated above. Please also visit chapter discussing Status – a thorough introduction to the way ADPOINT routes jobs from source to destination.
Workspace
Filters and user-definable views allow workflow operators, whether they work in the prepress or sales department, to monitor the latest status of each ad together with a ripped preview to reflect exactly how it will appear in the paper.
You can define several tabs reflecting the needs of your different tasks, one for ad tracking, one for monitoring a certain product and one for production ads you are working on.
Since the entire workflow is controlled by a central process on the ADPOINT server, all actions can be monitored from a single window. Furthermore, all interaction with advertisers and producers is gathered in the same system. Literally, everybody is on the same page, anytime, anywhere.
Setting up your workspace
This chapter explains how ADPOINT has been laid out to provide fast and accurate tools for optimal productivity.
The use of Tabs, drop-down menus, right-click menus, shortcuts, toolbars, message boxes, highlights etc. defines the workspace, which can be modified to accommodate users and groups.
After login, users view the main screen of ADPOINT. This window offers a number of ways to look at the bookings and materials in ADPOINT.
Panels
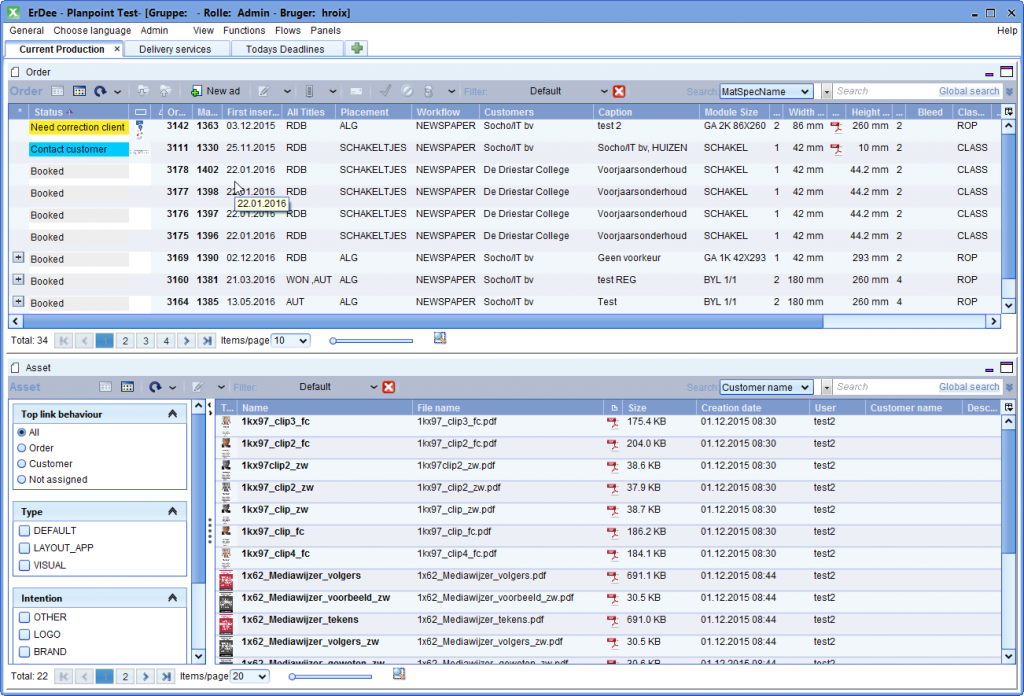
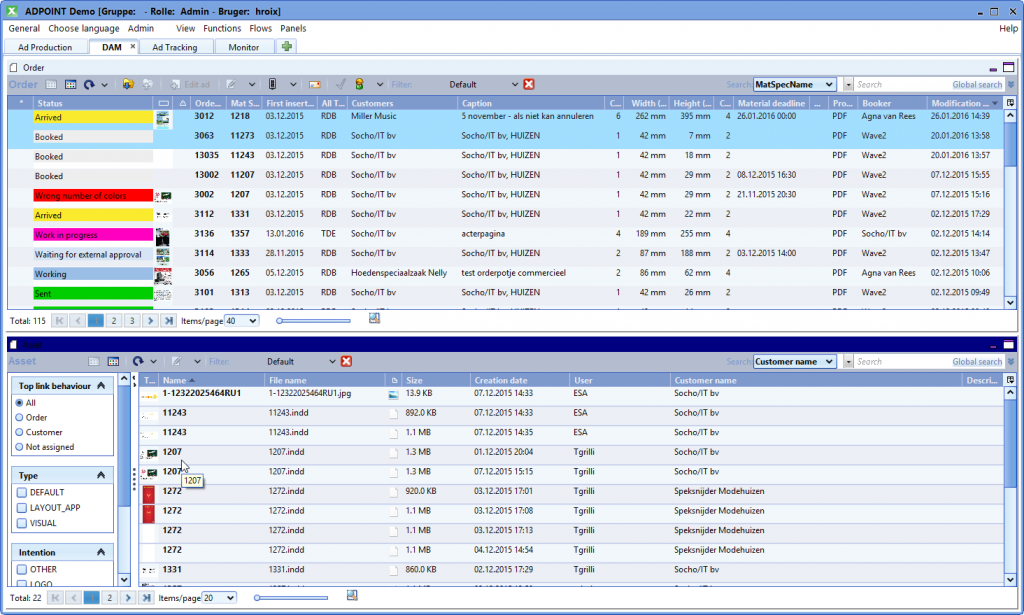
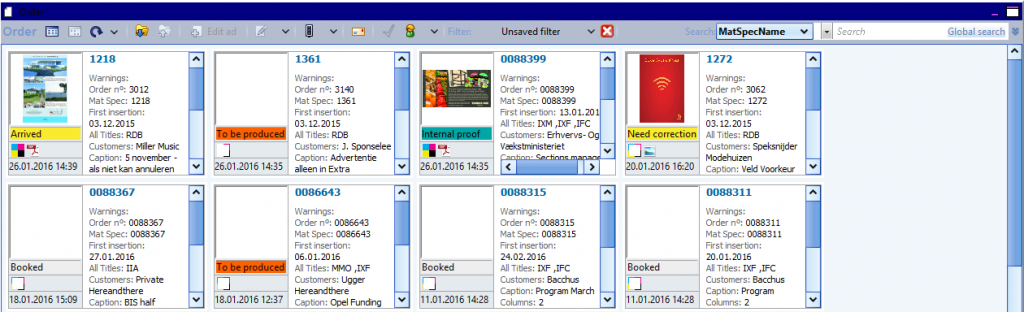
The illustration above shows the Digital Asset Management module “Graphics Management” or “DAM” with two panels. The upper job Panel showing bookings and the lower showing assets tha has been uploaded to ADPOINT to be used for ad production.
The Ad Tracking Module shows bookings in upper and ad materials in lower panel
Modules
Depending on installation and user permissions the following modules are available. Each module can be opened in one or more tabs according to your needs.
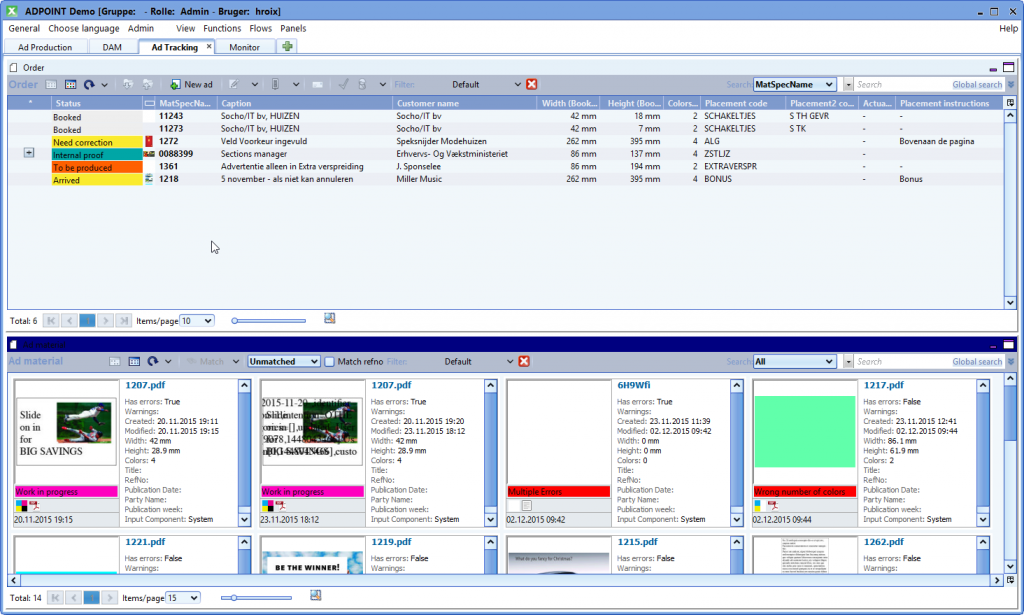
Ad tracking
Used for tracking ad materials which are not automatically matched with a booking. This module has two panels, the upper Order Panel showing bookings and the lower Ad Material showing ad materials.
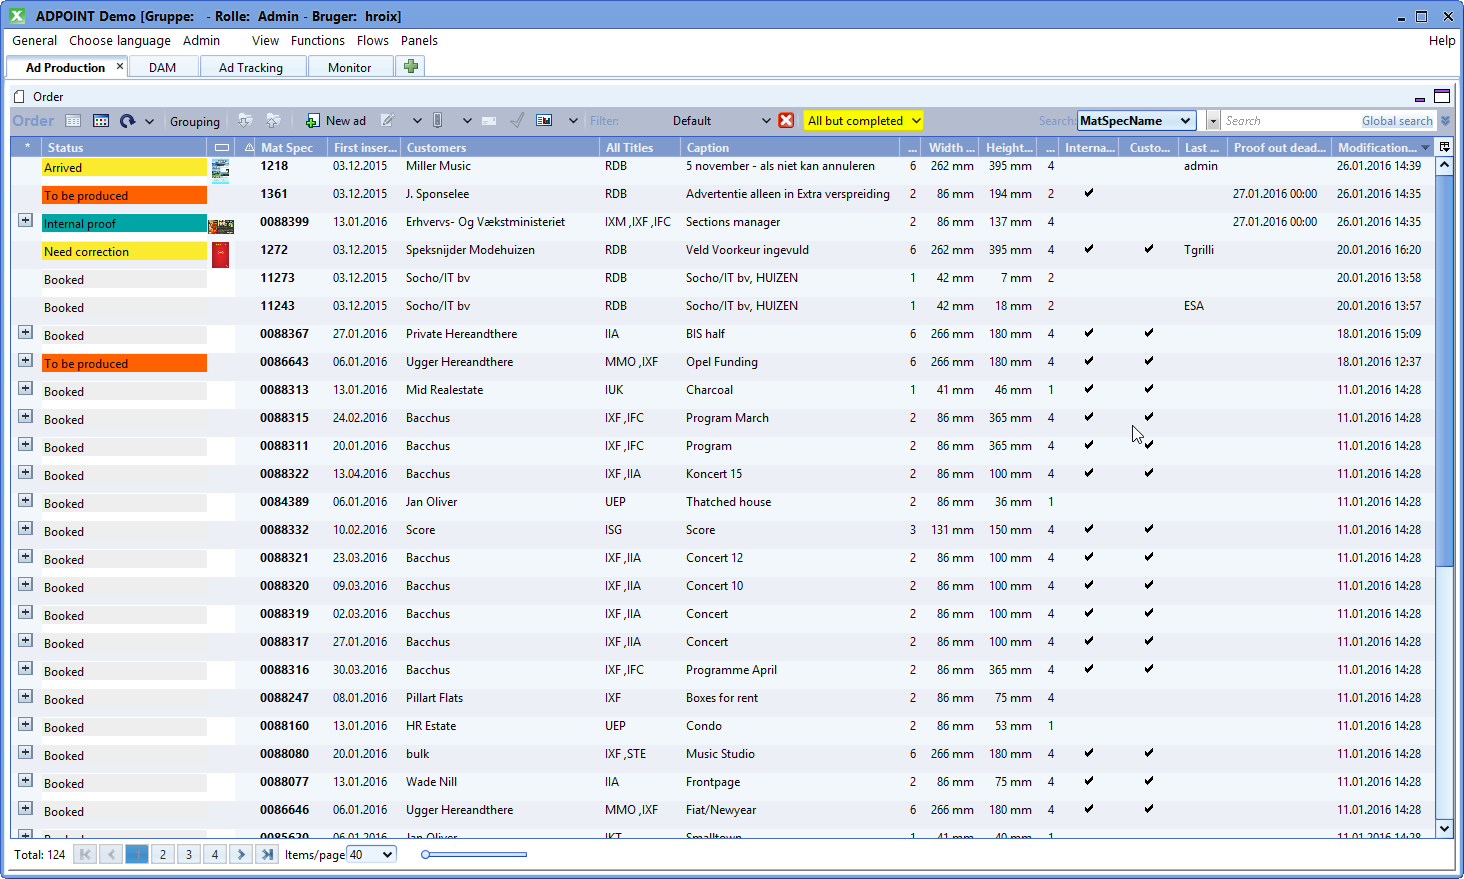
Ad production
Has one panel showing bookings. Working booked job through workflow, all the way form booking to approval. Can also be used to monitor bookings for various purposes, to see all bookings for a specific product/issue date for example.
Graphics Manager (DAM)
Digital Asset Management, work with and retrieve assets, i.e. logos, pictures and layout documents. GM module has two panels, the upper Order Panel showing bookings and the lower Asset Panel showing assets and asset tracking controls.
Monitor
Monitor Workflow progress and performance.
Deadline and Partner Rule
Setting up deadline and partner rules to apply deadlines and production partners to bookings coming in from adbooking system.
View Modes
ADPOINT has three different view modes:
List view
Data is displayed as text only – each booking, material or asset being represented by one row. Click on the column header to sort list on this column, click again to toggle list to show in descending or ascending order
Icon view
Small previews with a summary of important data. At the bottom of list and icon view you can set “Items per page”, browse pages and scale the size of icons or lines in listview.
Image view
Detailed information with large preview, tools and tabs for every booking, ad material or asset.
Menu bar
Functions, preferences and settings are available from the menu bar situated in the top of the ADPOINT window. Often used menu points can be activated with keyboard shortcuts. These are shown in the menu.
Tool Bar
A number of frequently used commands are available as buttons in the Toolbar. Mouse over text explains the buttons. See list below that explains buttons from left to right. The individual functions are described in Functions.
Order Panel: List & Icon view

(Left to right)
List View
Icon View
Refresh mode, menu to toggle manual or autorefresh
Grouping
Upload Assets
Download Assets
New ad / Edit ad booking data
Create / Edit in Layout application
Change Status
Email
Approve workflow step
Open Report
Choose Filter
Chose / activate predefined statusfilter
Order Details View

(Left to right)
Save changes
Refresh preview and data
Open job in HTML browser to see digital ads
Print Jobticket
Change Production Partner
Change status
Upload Assets
Download Assets
Email
Approve workflow step
Create / Edit in Layout application
Preview individual plates CMYK or all
Annotation tools, Yellow Poster, Frame, Highlight, Pin
Preview size slider
Fit preview to window
“Magnifying glass”
Admaterial Tools: Crop, Scale, Convert to BW, Trim whitespace, Add Whitespace
Note: Some buttons may not be available to you according to your role and access level.
Filters
ADPOINT filtering gives the user a detailed overview of the jobs in scope for just about any task to be performed. A simple filter is easily created on the fly or can be activated from a pool of saved filters.
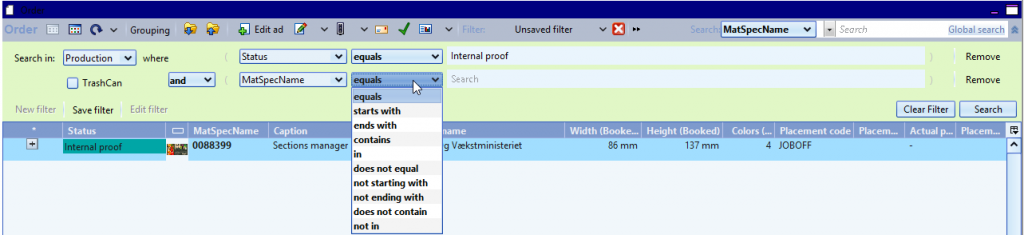
The filter dialog is expanded / collapsed with the double upwards and double downwards arrows in the upper right corner of the panel. Expanded very basic filter on status above is understood like this:
Search in production where Status equals “Internal proof” and Jobnumber equals …
Search in:
Production, Archived or Both
Jobs are typically archived a few days or weeks after first insertion date. In this way default filters are focusing on jobs in Production – but you can chose to search what is relevant, “all ads on a customer one year back” would need to search in Both: Production and Archived
Where
Field
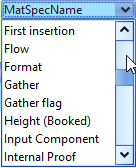
Data fields from booking system and ADPOINT.
In the example above the first field used is Status. Clicking the drop down icon reveals all the fields that are available for filtering. The list is very long but the often used fields are easily accessed by Right-clicking a value in list of jobs choosing “Filter by this value”. More about this later.
Operator
Equals, Starts with, Range … different operators on different kinds of data
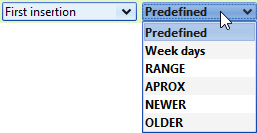
This example shows the operators when searching on a date. Most of these are self explanatory, “Range between to dates” – the Predefined is offering complex filtering at the tip of your fingers.
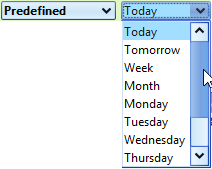
Predefined operator is available filtering “Date” and “Status”.
Chosing “First insertion” predefined Tomorrow returns what it sais, jobs for tomorrow i.e 2016-10-10.
The filter is is dynamic so coming in next day still shows “Tomorrow” i.e 2016-10-11
This is very useful for saved filters that will always show what is in scope for the coming day(s), week(s) or weekday

Predifined on Date adds two more fields: “Number of days” ahead and “Interval”.
Interval set: Interval from Tomorrow + 2 more days ahead.
Interval not set: Tomorrow + 2 days exact i.e “3 days from now”.
Value

Depending on type of data as for operators
Status value: “Internal proof”
Date predifined value: “Tomorrow”
Productioncode value: “Ready Material”
…
Filtering multiple fields

Typically a filter searches on multiple fields. This filter uses AND to search: All Chris Marks bookings for two titles for the next four days that are not already done:
First insertion predefined from tomorrow and 4 days ahead
AND Title equals IIA
AND Salesrep equals Chris Mark
AND status predefined “All but completed
To combine rows in the filter you can use AND & OR. This is where filtering becomes tricky. As long as you use only AND in a filter or use OR in another things are pretty simple.
As soon as you use both AND & OR the result becomes very different. If for example Marks filter above used OR instead of AND in the last line the result would be all Marks bookings for the specified days and Titles PLUS all other bookings in ADPOINT that are not done!
First insertion predefined from tomorrow and 4 days ahead
AND Title equals IIA
AND Salesrep equals Chris Mark
OR status predefined “All but completed”
“All Chris Marks bookings for two titles for the next four days PLUS all others that are not already done.”
If you must use both AND & OR you must make certain that the complete search is defined on both side of the dividing AND/OR. In this example it is the same search but on Chris Mark OR Betty Lewis
First insertion predefined from tomorrow and 4 days ahead
AND Title equals IIA
AND Salesrep equals Chris Mark
AND status predefined “All but completed”
OR
First insertion predefined from tomorrow and 4 days ahead
AND Title equals IIA
AND Salesrep equals Betty Lewis
AND status predefined “All but completed”
Note: Most combined filters can be handled with the operators “IN” or “NOT IN” like this
First insertion predefined from tomorrow and 4 days ahead
AND Title equals IIA
AND Salesrep IN Chris Mark, Betty Lewis
AND status predefined “All but completed”
For more details on operators and values please see Filter operators and values.
Field Definitions
Some data from ad booking systems and ADPOINT has the same importance for all user roles and ADPOINT functionalities. Status, Title(s), First insertion date, Customer and so on is important no matter what you are doing.
Other tasks requires more specific data in focus.

Traffic focus on ready material. “Material Deadline”, “Reference number” from delivery service, “Input channel”.

QA group and ad production focus on production ads: “Asset deadline”, “Proof Deadline”, “Production Method”, “Last producer”.
In upper right corner the Field Config icon opens a drop down menu with the fieldconfigs that are available for you.
If user has permission to do so the Field config can be edited on the fly, new created and shared with usergroups.
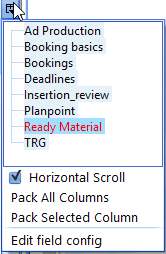
If columns are too many to show in window check “Horizontal Scroll” and “Pack all Columns”. This will add a horizontal scrollbar at the bottom of the list.
Modules and Panels
Three modules are most commonly used in every day work with adpoint. The modules has one or two panels as described below. The panels are described in detail under Panels chapters.
As you see below the same or different modules can be loaded in users ADPOINT. Each module can be set with own filters and column definition. In this way information and function for diffeerent tasks are always available. Click on the + and load another module.
Adproduction
The Adproduction module has one Order Panel showing bookings. As naming indicates this can be used by adproduction in case DAM is not licensed. Otherwise it is mostly used for overview purposes, to monitor status on all bookigs for a specific issue or all bookings in error status.
DAM module
Digital Asset Management or Graphics Manager module has two panles. Order Panel and below that the Asset Panel. This module is often used for preparing and producing ads as assets assigned to the order and the customer is readily at hand.
Adtracking Module
Ready material is typically automatically matched with booking by Drag ‘n Drop to the booking or via the Customer Portal. However, ADPOINT can also upload admaterial from delivery services using FTP or hotfolders.
Matching files coming through these input channels automatically requires excact data in both booking and file. If a material cannot math a booking it will show up in Admaterial Panel as “Unmatched”. User can Drag ‘n Drop the file to the correct booking when this is available.
Order Panel
The Order Panel is probably the most important panel and is always shown at the top of modules.
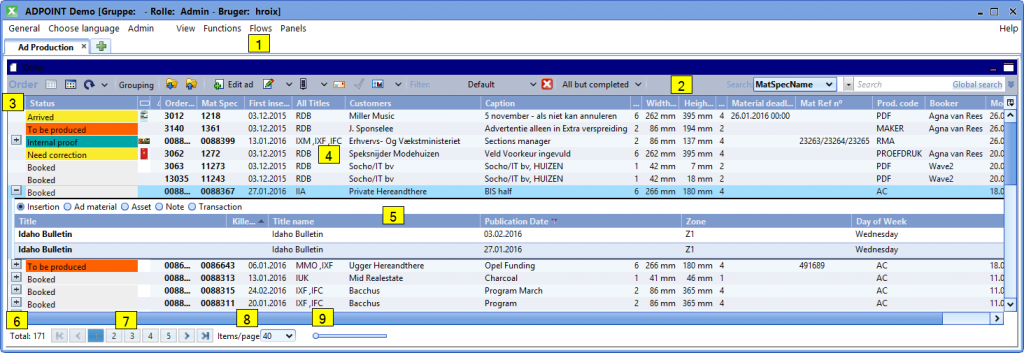
Functions Menu with all available functions. This menu is also available when right clicking with on or more bookings selected.
Toolbar with the most commonly used functions, Filter menu and Quicksearch.
Column headers. Clicking on a header once or twice will sort the list descending or ascending
Bookings shown in list or as Icons with a larger preview.
Insertions detail unfold/fold. Shows all insertions if booked for more dates or titles
Number of bookings in actual search and page browser
Pages in actual search
Number of bookings shown pr. page
Slider to increase decrease size of lines in List View or previews in Icon view
Asset Panel
The lower panel in DAM module holds all the assets and the functionality to work with assets and assigning these to bookings.
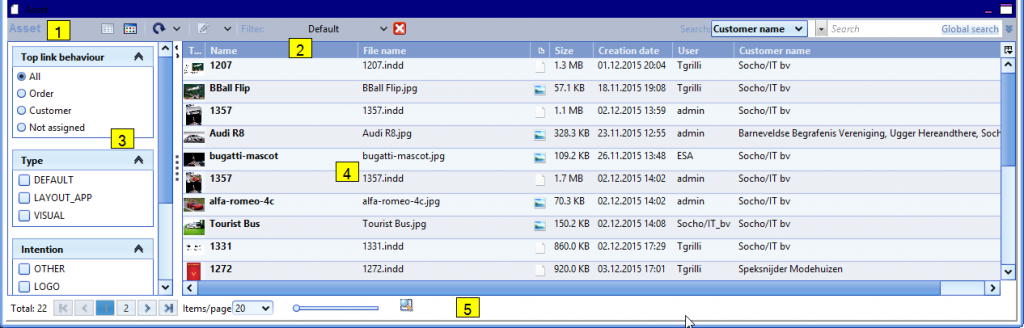
Toolbar with the most commonly used functions, Filter menu and Quicksearch.
Column headers. Clicking on a header once or twice will sort the list descending or ascending
Asset control sidebar to focus on assets based on relation to bookings, tyoe and intention
Assets shown in list or as Icons with a larger preview.
Bottom controls similar to Order Panel
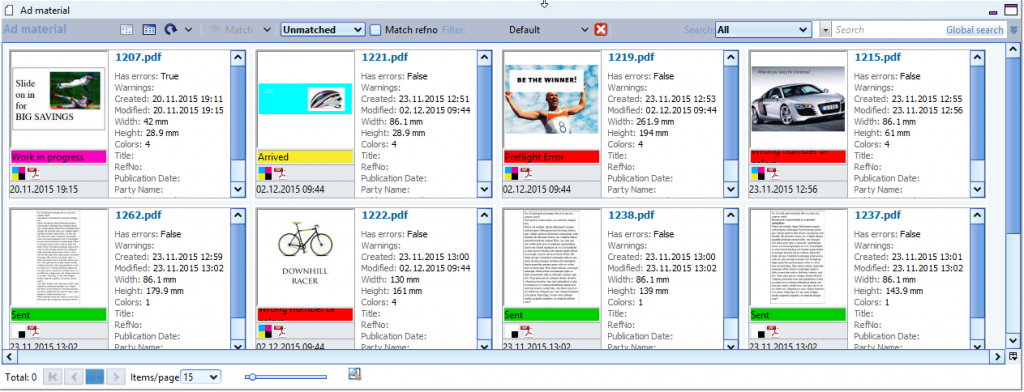
Ad Material Panel
Ad Material panel shows materials uploaded to specified flow. As most ad materials match with bookings these are best monitored in the upper “Order Panel” where booking data together with the preview of the ad material and the status gives the full picture.
Materials coming in via delivery services, self service protals or hotfolder may not match a booking. This is where the default Unmatched tool comes in. Waht you see below are unmatched ad materials. User Drag ‘n Drop to matspecs in upper panel the materials to match ad material and matspec. File is automatically renamed and can be sent on to pagination or publishing.
List and Icon View
In all panels toolbars the list and icon buttons will switch between List View and Icon View.
List View

Icon View
Details View
Details view offers a lot of information and functionality for the individual matspec.
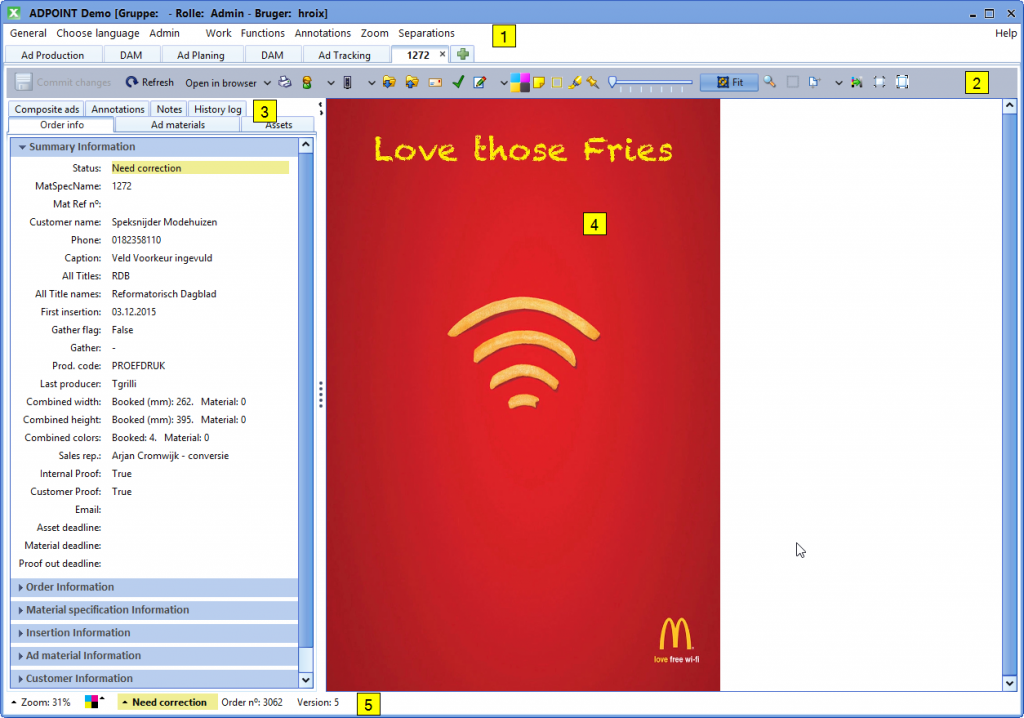
Menus: Work, Functions, Annotations, Zoom, Separations
Toolbar: Often used commands and functions
Information Tabs: Detailed information grouped on type of info
Preview: Composite of four plates if a print, a jpg on digital ad
Info bar: Infor on zoom, status & version
Tool Bar

(Left to right)
Commit changes: Saving changes to notes, deadlines, annotations. Active when pending changes
Refresh: Refreshes preview
Open in Browser: Useful for digital ads to see animated elements and hear sound
Print jobticket
Change Productionsite
Change Status
Download assets
Upload assets
Email
Approve workflow step
Open/Edit in InDesign: Drop Down for other options
Preview indivual plates or composite
Annotation tools
Preview size slider
Fit to window
Magnifying glass
Material correction tools
Crop
Scale
Convert to B/W
Trim Whitespace
Add Whitespace