...
Table of Contents | ||||
|---|---|---|---|---|
|
Looking for the Administration Guide? Click here
...
Finding your way around
...
Getting an overview
...
Opens the campaign tab to allow upload of a new schedule line.
Admin settings
This section describes various ways to configure settings in ADPOINT.
| Note |
|---|
Please note. The following features are available to users with Administrator credentials only. |
Accessing the Admin settings
The Admin settings menu is found in the user button on the main view:
...
This opens the Admin panel where all administrator settings can be accessed.
...
| Info |
|---|
To find a specific setting, you can search for it using the Admin panel search found in the top of the left panel. |
Template editor
The template editor is a tool to set up notification templates. In here the actual design and content of the message is set up.
The templates that have been created are show in a list:
...
Clicking in the
| Status | ||||
|---|---|---|---|---|
|
Clicking the pencil icon edits the selected template.
Clicking the red x button deletes the selected template (after a confirmation dialog).
Creating a template
...
Template name: Enter the name of the template
User Group Settings: Select the group(s) that is able to access the template.
Value: Enter a value for a material specification that should be used to populate the fields during the design process.
Auto: Set this switch to “on” if the template should be used for automatic sending. If the switch is set to “off” the template can only be used to manual sending.
Properties fields:
From: The name of the sender
To: The email address of the receiver (will only be used for non-automatic templates).
Subject: The email subject
Reply to: The email address for automatic replies
CC: The cc email address(es)
Email type: Select the type: Proof, Material, Tearsheet or Asset
Proof type: Select the prooftype: Email for proofs sent as email without attachment, PDF for proofs sent as an attached PDF file.
Language: The language of the template (used elsewhere to filter templates).
Set status: Select the status for the ordre upon sending the email.
Phone no: The phone number for SMS/Text messages
Text message: The content of an SMS/Text message
Variables:
Use this text area to define variables used in the mail template.
Template design:
Body: Enter the HTML code for the email template
Preview: Press the
| Status | ||
|---|---|---|
|
| Info |
|---|
Change the value field to test the template with other orders. |
Email scheduler
The email scheduler is in fact a ruleset to determine under which conditions emails should be sent automatically. In the Email scheduler it is also possible to define exceptions to prevent rules to run under certain conditions.
...
Clicking in the
| Status | ||||
|---|---|---|---|---|
|
Clicking the pencil icon edits the selected rule.
Clicking the red x button deletes the selected rule (after a confirmation dialog).
| Note |
|---|
To activate a rule, the checkbox to the left of the rulename must be checked. |
Mail sending rules
Mail sending rules are a ruleset that defines how mails are automatically sent. A mail sending rule is a set of instructions to determine which conditions should be present, when a mail is sent what status it triggers and if there are any exceptions to be honored.
When all conditions in a mail sending rule are met, and the rule is active, the rule fires. That means that the rule executes the sending of the email and other actions attached to the rule.
Edit Mail Sending Rules
For each mail sending rule you can define the following:
Rule name: The name of the rule in free-text form.
Relative to: Select the deadline to which the mail sending rule relate. The availability of deadlines depends on how deadlines are generally maintained in your system. Refer to your system administrator for more details on available deadlines.
Level: The orderlevel to which the mail content should relate. Choose between Lineitem to send emails that contain links to the exact line-item (typically an order) or choose Campaign to send emails that contain links to an entire campaign.
Exclude weekends: The rule should not fire if the weekday is a Saturday or Sunday.
Active: Generally set the rule active or inactive. Inactive rules never fire.
Set initial statuses: Set the status that should be set on the order when the rule has been activated.
Standard mode/Expert mode: Select how the filter should be defined. In standard mode, the filtering mechanism is used to select the orders to which the rule applies. In Expert mode, it is possible to enter code to define the selection of the orders to which the rule applies. Expert mode coding is not covered here.
Standard mode
A filter is a limitation to narrow down the situation when a mail sending rule should fire. A filter consists of the following:
Field: A field from the database that contains information about the order. Fields that are available for filtering are subject to configuration.
Operator: Defines a way to compare the value of the Field to the value in the Value field. I.e it could be larger than, equals, does not equal etc.
Value: The actual value to which the content of the Field compares. Depending on the nature of the field, there could be different value presented in the dropdown list of the Value field. In some cases, multiple values can also be applied which enables the filter to look for more than one value to find out if there is a match.
The + and the X signs are used to add multiple filter lines or delete filter lines.
Logical is an operator that connects multiple filter lines. It can be either “And” or “Or”. “And” means that all lines must be true while “Or” indicates that either one or more lines must be true for the rule to fire.
Actions
Actions are the actual actions performed by ADPOINT when a rule fires. You can add as many actions as you wish, but usual 1-3 actions suffice most conditions.
Each Action is defined with the following fields:
Days: How many days before the deadline (defined above) should the action take place. A day is a full day of 24 hours.
Hours: How many days before the deadline (defined above) should the action take place.
Minutes: How many minutes before the deadline (defined above) should the action take place.
Example: If days is set to 2, hours is set to 6 and minutes set to 30, then the action takes place 2×24 + 6 = 54 hours + 30 minutes before the chosen deadline.
Template: A list of email templates that are available.
Set status: The status to set after the action takes place.
To add an action, click the Add Action button.
To edit an action, click the pencil next to the action.
To delete an action, click the red X next to the action.
Exceptions
Exceptions make it possible to prevent a rule from firing even if criteria for firing are met. This is useful if i.e. a single customer should be excluded from a rule. In that case, the customer can be defined an exception allowing the rule to fire for all customers but the one defined as an exception.
...
To add an exception, click the Add Exception button.
To edit an exception, click the pencil next to the action.
To delete an exception, click the red X next to the action.
Each exception should have a descriptive name.
A filter can be defined, and it works just as for actions but the result of the filter is “subtracted” from the result of the rule filter.
When the exception filter is applied all orders that are found by the exception filter will be handled in accordance with the exception.
Material request: When set, the exception will send a material request in accordance with the settings below. If not set, no material is sent and the exception will simply leave orders found in the exception filter out of the mail sending rule.
Frequency: The time interval for sending mails in accordance with the exception.
Time: The time of date (according to the timezone of the ADPOINT server) when the mail should be sent.
Template: A list of email templates that are available.
Set status: The status to set after the action takes place.
Look ahead day(s): The number of days the rule should look ahead to include orders. If i.e. the look ahead is set to 7 days, the email (if set) will include orders where the deadline (ad defined for the mail sending rule) lies within 7 days from the day the rule was fired.
Creative mappings
Creative mappings only applies to digital creatives and it is a ruleset that translates internal material specification descriptions into values used by ADPOINT to define size (width and height) as well as a target. A target is a routing point to which the order and creative will be directed downstream in the workflow.
...
To add a creative mapping, click the + button.
To edit a creative mapping, enter a new value in (one of) the field(s).
To delete a creative mapping, click the red X next to the creative mapping.
To save a creative mapping, press the check mark next to the creative mapping.
Field: Select a fieldname to impact on the creative mapping from the list.
Operator: Defines a way to compare the value of the Field to the value in the Value field. I.e it could be larger than, equals, does not equal etc.
Value: Enter the value to compare to.
Logical: Select an operator that connects multiple filter lines. It can be either “And” or “Or”. “And” means that all lines must be true while “Or” indicates that either one or more lines must be true for the rule to be active.
Width: Enter the value to be assigned to the width of the material specification.
Height: Enter the value to be assigned to the height of the material specification.
Target: Width: Enter the value to be assigned to the target of the material specification.
To add an extra set of properties for the mapping rule, click the + sign. This way multiple rules can be assigned to the same definition of Width, Height and Target.
Validation
Validation is the process of testing (validating) creatives when they are uploaded to ADPOINT.
A validation profile is a list of the tests to be carried out. This can be compared with a checklist of tests.
A validation filter is a rule that is used to determine which validation profile should be applied depending on a number of properties of the order or the creative. This way, ADPOINT can automatically choose the correct Validation profile depending on the nature of the creative. In other words, ADPOINT can apply different test depending on the creative type, the customer preference, the publication and many more options.
Validation filters
Validation filters are used to select the orders to which a certain validation profile should apply.
...
There are a set of validation filters for Digital and Print respectively. These can be selected by the Tab above the list of validation filters.
To add a validation filter, click the + button.
To edit a validation filter, enter a new value in (one of) the field(s).
To delete a validation filter, click the red X next to the creative mapping.
To save a validation filter, press the check mark next to the creative mapping.
Field: Select a fieldname to impact on the creative mapping from the list.
Operator: Defines a way to compare the value of the Field to the value in the Value field. I.e it could be larger than, equals, does not equal etc.
Value: Enter the value to compare to.
Logical: Select an operator that connects multiple filter lines. It can be either “And” or “Or”. “And” means that all lines must be true while “Or” indicates that either one or more lines must be true for the rule to be active.
Profile: Select the validation profile that this filter should apply to.
To add an extra set of properties for the mapping rule, click the + sign. This way multiple rules can be assigned to the same definition of Width, Height and Target.
Validation profiles
Validation profiles consists of a number of checkpoint that ADPOINT validates. The result of a validation is displayed in the validation report which can be accessed in the Summary and Validation panels.
...
The following applies to the definition of validation profiles for digital creatives only. Validation profiles for print creatives are defined in a separate application and covered elsewhere.
To add a validation profile, click the
| Status | ||
|---|---|---|
|
To delete a validation filter, click the red X next to the creative mapping.
To duplicate a validation filter as a child profile, click circle with a plus sign. Enter the name of the child profile in the name field.
| Info |
|---|
Child profiles are separate profiles that are connected to a main profile. If a property is changed in the main profile, the change is also applied to the child profile. |
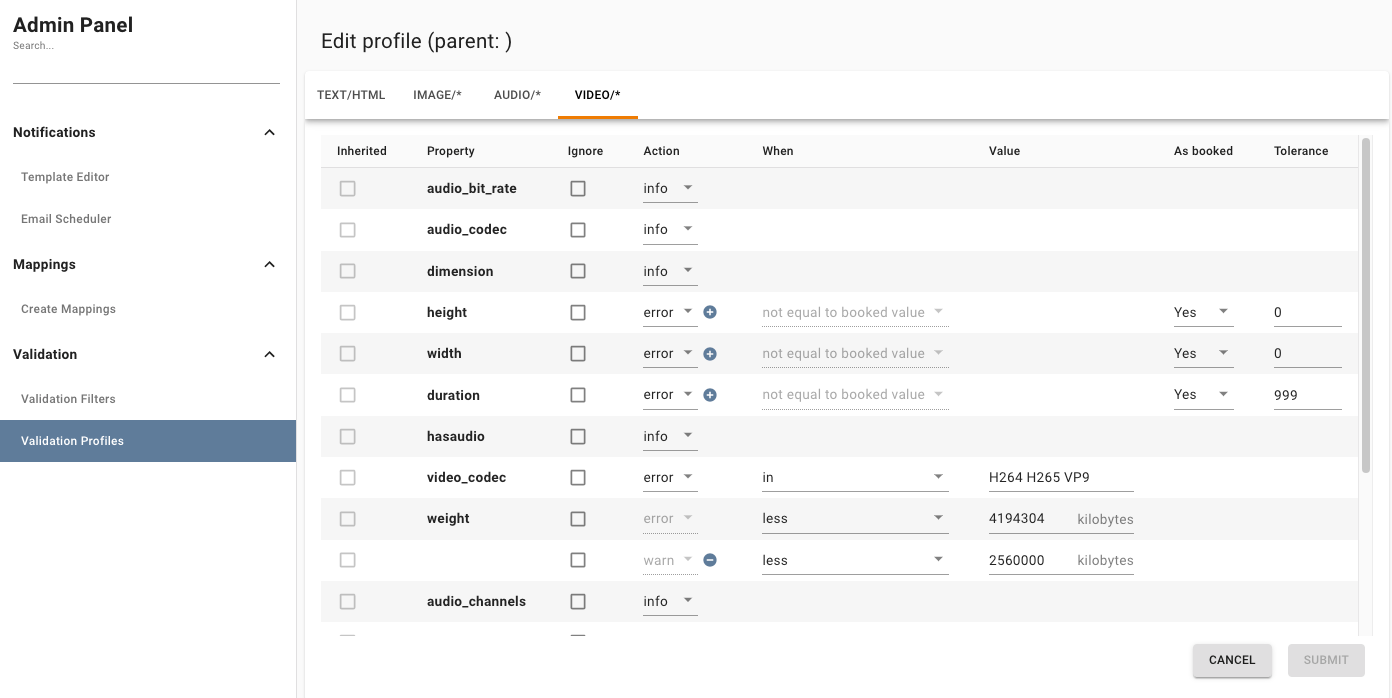
The profile is split into 4 sections - shown as tabs above the properties:
Text/HTML: Contains properties that are defined as text.
Image: Contains properties that relate to images
Audio: Contains properties that relate to sound
Video: Contains properties that relate to video.
Defining the validation
Under each section, the properties that can be validated are listed. For each property, the level of validation can be defined.
Inherited: If checked, this means that the validation is inherited from the parent profile.
Property: The name of the property. This cannot be changed.
Ignore: If checked, the property will not be validated
Action: Select how the validation should appear in the validation report.
Error: If the validation fails, the result will be flagged as an error.
Warn: If the validation fails, the result will be flagged as a warning.
Info: The result will be listed as information regardless of the outcome of the validation.
When: A list of operators that determine how the result compares to the value.
Value: The value the validation result compares to.
As booked: If checked, the validation result is compared with the booked value.
Tolerance: A value to indicate a range in which the validation result can be without being recognized as an error.
...
Press
| Status | ||
|---|---|---|
|