About this documentation
This User Documentation covers the HTML pages for ADPOINT version 7.11.
As ADPOINT can be configured in many ways, some of the features described herein may not be available to some users due to specific configurations and user permissions.
Unless otherwise described, this documentation covers the English language setting of ADPOINT. You can however easily switch between English language and your preferred language through the user menu of ADPOINT. This may help you find out what a specific feature is called in your language.
Table of Contents |
|---|
Finding your way around

Getting an overview
The main screen is the place to get an overview of your current ad production. Through the use of tabs, and filtering tools, the overview shows order-lines where each line represents a specific order in your system.
Stay organized with tabs
A Tab is a window that is set up to show exactly what you want in ADPOINT. Tabs are automatically saved on your user profile.
The currently selected tab is marked with bold text and a colored bar beneath.
Tabs can be used for many purposes, but they are especially handy when used with filters as filters can be applied to tab while you can have other tabs showing other subsets of orders.
Creating, renaming and deleting tabs
To create a new tab, press the + sign at the right end of tab line. You will be prompted to select a tab type:
AdProduction | Uses the entire screen to show a list of orders |
AdTracking | Has a split-screen view to show orders and materials |
Dam | Has a split-screen view to show orders and assets |
By default a new tab gets the name of the chosen type, but they can be renamed by double clicking the tab name and entering a new name. Tabs used for campaign view cannot be renamed or deleted.
To close a tab, click the circle with an x that appears when hovering a tab with the mouse. You will see a warning dialog asking if you really want to close the tab.
Tip: Hold down the Option key while clicking the close icon to surpass the warning.
Please note: You can set up as many tabs as you like but we recommend you limit the number of tabs to a few essential ones. Not only is it easier to overview, but a lot of tabs can also slow down your browser and reduce general system performance.
The toolbar
The toolbar contains the most used features and commands. Its content depends on the tab type but in general these are the functions found in the toolbar
Actions | Contains a list of actions that can be performed on two or more marked order lines. |
Show | Select if the list should contain orders that are running, archived or both. |
Column settings | Select the column set to be shown in the list. Column sets can be defined by users with Superuser or Administrator credentials. |
Refresh | Set auto refresh intervals or completely switch off auto refresh. You can also use the circle/arrow icon to force a refresh. |
Search | Enter a string to search for. ADPOINT is configured to look for the string in a set of selected fields. |
Choose filter | Select a filter from a list of saved filters. Pressing the Pencil icon opens advanced filtering. |
Clear filter | Clears all filters and searches and shows all order lines (but still honors the settings in the Show menu). |
User menu | Here you can select your preferred language, open the administration panel, request a password change, log out and clear user preferences. Please note that clearing user preferences will reset all tabs. Data in lists, saved filters and column definitions are still available. |
Lists
The list shows all the orders or assets (items) that are currently found. The lists are shown in the current sort order which can be changed
Column headers
The column headers shows which data is displayed in the list. You can change the column headers by selecting a Column setting in the toolbar.
Column widths can be adjusted by dragging the vertical divider between the columns.
Sorting
To sort on a column header simply click it. To toggle ascending and descending sort order press the same header again. A small arrow will indicate the selected sort order:
▼ = Descending sort order
▲ = Ascending sort order
Order lines
An order line consists of data that is imported from the order management system (booking system) as well as data generated by ADPOINT. The data shown in each order line varies from system to system, but in general a status, a preview and an order or campaign number, is shown alongside various other data.
Special fields in the order line:
The status field shows the latest status of each order. For a complete list of statuses please look here.
In general, statuses are color grouped to make it easier to understand the overall status of the orderline.
Red means that there is an error that prevents the order line to be further processed. Some errors are related to the content of the creative, while others relate to system errors.
Blue is generally used by order lines in transition, ie. during processing or waiting for internal or external user action(s).
Yellow is used for order lines that require some kind of manual action to proceed, i.e. waiting for approval.
Green is used for order lines that have been fully and successfully processed.
Deadlines fields can change background color depending on the remaining time before a deadline is met. Subject to configuration.
Tip: Clicking on any text in the list (except dates, statuses and links), will copy the value to the clipboard.
Marking order lines
Some lists also have a marking feature. This is useful if you want to mark two or more lines.

Click the checkbox in the marking column for each line that should be marked. To unmark click the checkbox again. If you want to mark or unmark all lines in the current list, click the checkbox in the column header.
When one or more lines are marked, the Actions menu in the toolbar becomes active.
Multiple insertions
Some orders have multiple insertions which can be viewed by clicking the chevron icon in the left side of the order line. The insertion list can be closed again by clicking the same icon. Subject to configuration.

List footer
If there are more items than what can fit on one page, you can navigate through pages using the forward and backward buttons in the footer.

Here you can also change how many items should be displayed on each page.
Campaign Portal
Campaigns are handled in a separate window called the Campaign Portal.
Go to Campaign Portal documentation here.
Finding orders, creatives and assets
ADPOINT has powerful search and filtering features that allow you to build both simple and complex filters.
Searches are a quick way to find one or more orders that you can identify by a single piece of information like i.e. a customer name, a word from the caption etc.

In the toolbar, searches can be entered directly in the search field. The search field is configured to perform searches within a limited number of columns in the current found set of items.
This means that if you have applied a filter, search will will be performed into the found set. If you want to search all items, you can clear all filters by pressing the Clear button If you let the mouse hover over the search field, you can see which columns will be included in the search.
As you type in the search field, ADPOINT will try to suggest possible matches.
Filtering

Filters are in fact searches that can be saved and reused. In addition, filters can be more complex than searches as a filter can be set up to look for items that match multiple parameters.
Filters can also be saved and reused - see saving a filter below.
Creating a filter
To enter the filter panel, press the pencil icon in the filter button in the toolbar.
Filters consist of one or more line, each defining a specific search. A search is made up by:
Column | A list of column names that can be used in the filter. |
Operator | A list of words describing how the column relates to the value. |
Value | A text or number to which the column relates. |
Example:
If you want to find all order lines where the Sales rep name begins with John, you will set up a filter that looks something like:
[Sales rep] [begins with] [John]
Filters can have multiple lines, each defined as above. When a multi-line filter is created, you will also get the option to define how each line works with the other. In the beginning of the second and subsequent filter lines, there will be an And/Or operator.
And | means that the previous line and the current line should be “true” to find an item. |
Or | means that either the previous line or the current line should be “true” to find an item. |
Example:
[Sales rep] [begins with] "John" and [Adtype] [equals] "digital" finds Johns digital ads
whereas
[Sales rep] [begins with] "John" or [Adtype] [equals] "digital” finds items that either belong to John or are digital ads.
Lines in the filter can be removed by clicking the Remove button.
Filters can have as many lines as needed. But for performance reasons, it is recommended to keep them as short as possible. Also try to make use of positive filters.
Example: instead of filtering all “items that are not print” use “items that are digital”
Saving a filter

Filters can be saved and reused later. To save a filter, press the Save button in the filter panel.
In the save dialog you can define other user groups who should be able to use the filter (subject to permission settings) and you can create folders to organize your filters.
Using a saved filter
Saved filters appear in the filter button in the toolbar. Here, they are appear directly in the list, or if they are saved in a folder, in sub-menus of the list.
Filter on value
For some of the values in the items list, it is possible to apply a filter based on one of the values in the list. Simply press shift and click on the value to be filtered. The list is filtered on that exact value showing only items that has the filtered value.

The filtered value is highlighted by a color. The Clear filter button in the toolbar is also highlighted to indicate how to clear the filter again.
Tip: It is possible to apply multiple value filters at the same time. Simply press shift and click each value the filter should contain.
Ad Tracking
While for the most part, ADPOINT automatically matches materials and orders, there may be situations where there is a need for manually matching or even splitting already matched materials and orders.

The Ad Tracking tab
In the Ad Tracking tab, ADPOINT shows orders in the top window and materials in the bottom window. By default, the bottom window shows all materials, but through the Show menu in the toolbar, it can be set to show, i.e. unattached materials.
Attaching materials to orders
If, for any reason, ADPOINT has not been able to match, or attach, a material to an order, it will appear in the list of unattached materials.
To find the corresponding order, you can make use of searches and filters.
When you have found the order, simply drag the material from the lower window to the order in the upper window. Upon release of the mouse, the material is attached to the order.
Tip: Click the “Restrict to selected size” checkbox in the toolbar of the lower window, to let ADPOINT assist you in finding orders that match the size of the material you have selected in the lower window. This way, there is a good chance that the order you are looking for, will appear in the to of the orderlist in the upper window.
Detaching materials from orders
To unassign a material from an order, find the material in the lower window and select “Unassign” in the Actions menu.
Working with assets
Assets are the components that are used by creative designers to build an ad. Typical examples of assets are images, logos, copy and ss such assets can be any filetype.
Assets and order relations
In ADPOINT, assets are stored as individual items and ADPOINT automatically keeps track of how an asset relates to and orders. And since an order relates to a customer, ADPOINT also knows which assets belong to the customer.

In Dam tabs, the screen is split to show orders on top and assets in the bottom.
When clicking an order in the top window, it is possible to define how it relates to the assets in the bottom window.
The relation between the order and the asset list can be defined by the Match menu in the toolbar above the asset list.
All | All assets are shown |
Customer | Only assets belonging to the Customer of the currently selected orderline are show in the asset window. |
Order | All of the above are impacted by active filters in the asset window. |
Asset types
Asset types are currently not supported in ADPOINT 7.11.
Finding and filtering assets
Searches and filters can be applied to the asset window just as for any other list in ADPOINT.
In the toolbar of the asset window, there is an extra set of built in filters to enable filtering on the asset type (Not supported in ADPOINT 7.7)
Uploading assets to orders
To upload an asset to an order, simply drag the asset from the desktop on to the orderline.

ADPOINT prompts you to decide if the uploaded file(s) are to be uploaded as assets or ad materials.
Assigning assets and orders

To assign an asset to an order, select an order in the order window and then choose “Assign” from the Actions button in the asset line of the asset you want to assign.
You can also do this by dragging one or more assets from the asset window to the order in the order window.
Unassign assets and orders
If you want to unassign an asset from an order, an thus breaking the relation between them, you select an order in the order window then choose “Unassign” from the Actions button in the asset line of the asset you want to unassign.
Actions
Actions can be applied to one or more items at a time.
Applying actions
To apply an action to a single item, simply press the action button in the item to see a list of available actions.
To apply an action to multiple items, select the items using the marking function, and the click the action button in the toolbar.
Actions
Approve
Approves the currently selected item(s) and thereby initiates the approval workflow. This will cause a change in the status.
Assign production

Opens a dialog where various properties of a production order can be assigned. Subject to configuration.
Campaign
Opens the campaign tab for the currently selected item.
Change production site

Makes it possible to change the production site for one or more orders. Select the new production site in the “Set new value” selector and click the CHANGE button to apply.
Change status

Manually overrides the status for the currently selected item(s).
Check in
Imports files from a local drive. This feature is typically used after production files have been checked out (see check out), modified and saved. Files are automatically imported from the folder that was used as a destination folder on check out.
Check out
Copies the production files attached to the currently selected jobs to the local harddrive. From here the files can be modified and saved, whereafter they can be checked in again (See Check in).
Please note that in order to save files to a local drive, you may be prompted to set permissions. Please refer to the documentation for your operating system.
Delete
Deletes the currently selected item(s). Please note this cannot be undone.
Detach
Detaches the creatives of the latest version of the currently selected item(s).
Detached creatives will appear in the lower window of the Ad Tracking tab.
Details
Opens a tab with the details window
Download
Downloads the latest version of the production creative for the currently selected item. A dialog is presented to select the destination of the downloaded file(s).
Edit order
Edits the currently selected order. Subject to configuration.

Makes it possible to manually send emails in relation to the selected item(s). You can pick an email template from the library of installed templates and you can override any suggested values for receives, ccs and bccs as well as the content of the message itself.
The email function can also be used for sending SMS or Text messages. Subject to configuration.
Initiate
Makes it possible to edit various properties of a production order. Subject to configuration.
Lift

Makes it possible to copy original files and/or layout documents and assets from other orders. This is handy if you want to use the layout and assets from another order to create a new.
New order

Makes it possible to create a new order. Useful for spec-ads and other specials. Orders have separate numbering and are therefore easy to find with suitable filters. Please note that information entered here is not sent to the booking system. Subject to configuration.
New note

Opens a dialog to enter a new note on the currently selected item.
Open in InDesign
This feature requires that the ADPOINT InDesign plugin is installed on the same computer from where the Open InDesign function is activated.
Please see the InDesign plugin documentation here.
For print creatives that are marked for production, the Open InDesign action does the following:
If no InDesign file has been assigned, a blank InDesign document is opened in InDesign. The document will be given the dimensions of the booking
If an InDesign already has been assigned, it will be opened.
Additional information about how InDesign can be used with ADPOINT, and how the re
Please note that in order to use InDesign from your computer, you may be prompted to set permissions. Please refer to the documentation for your operating system.
Reprocess
Reprocesses the selected item(s) to undergo the same workflow as if it was just uploaded.
Upload Asset
Opens a select box where materials can selected for upload. Once uploaded, ADPOINT will begin processing the materials.
Opens the campaign tab to allow upload of a new schedule line.
Deletes the currently selected item(s). Please note this cannot be undone.
Upload new
Opens the campaign tab to allow upload of a new schedule line.
Admin settings
This section describes various ways to configure settings in ADPOINT.
Please note. The following features are available to users with Administrator credentials only.
Accessing the Admin settings
The Admin settings menu is found in the user button on the main view:

This opens the Admin panel where all administrator settings can be accessed.

To find a specific setting, you can search for it using the Admin panel search found in the top of the left panel.
Template editor
The template editor is a tool to set up notification templates. In here the actual design and content of the message is set up.
The templates that have been created are show in a list:

Clicking in the CREATE NEW TEMPLATE button open a new blank template.
Clicking the pencil icon edits the selected template.
Clicking the red x button deletes the selected template (after a confirmation dialog).
Creating a template

Template name: Enter the name of the template
User Group Settings: Select the group(s) that is able to access the template.
Value: Enter a value for a material specification that should be used to populate the fields during the design process.
Auto: Set this switch to “on” if the template should be used for automatic sending. If the switch is set to “off” the template can only be used to manual sending.
Properties fields:
From: The name of the sender
To: The email address of the receiver (will only be used for non-automatic templates).
Subject: The email subject
Reply to: The email address for automatic replies
CC: The cc email address(es)
Email type: Select the type: Proof, Material, Tearsheet or Asset
Proof type: Select the prooftype: Email for proofs sent as email without attachment, PDF for proofs sent as an attached PDF file.
Language: The language of the template (used elsewhere to filter templates).
Set status: Select the status for the ordre upon sending the email.
Phone no: The phone number for SMS/Text messages
Text message: The content of an SMS/Text message
Variables:
Use this text area to define variables used in the mail template.
Template design:
Body: Enter the HTML code for the email template
Preview: Press the VALIDATE AND PREVIEW button to show a preview of the template here. The data from the Value field will be used to populate the preview.
Change the value field to test the template with other orders.
Email scheduler
The email scheduler is in fact a ruleset to determine under which conditions emails should be sent automatically. In the Email scheduler it is also possible to define exceptions to prevent rules to run under certain conditions.

Clicking in the CREATE NEW RULE button open a new rule.
Clicking the pencil icon edits the selected rule.
Clicking the red x button deletes the selected rule (after a confirmation dialog).
To activate a rule, the checkbox to the left of the rulename must be checked.
Mail sending rules
Mail sending rules are a ruleset that defines how mails are automatically sent. A mail sending rule is a set of instructions to determine which conditions should be present, when a mail is sent what status it triggers and if there are any exceptions to be honored.
When all conditions in a mail sending rule are met, and the rule is active, the rule fires. That means that the rule executes the sending of the email and other actions attached to the rule.
Edit Mail Sending Rules
For each mail sending rule you can define the following:
Rule name: The name of the rule in free-text form.
Relative to: Select the deadline to which the mail sending rule relate. The availability of deadlines depends on how deadlines are generally maintained in your system. Refer to your system administrator for more details on available deadlines.
Level: The orderlevel to which the mail content should relate. Choose between Lineitem to send emails that contain links to the exact line-item (typically an order) or choose Campaign to send emails that contain links to an entire campaign.
Exclude weekends: The rule should not fire if the weekday is a Saturday or Sunday.
Active: Generally set the rule active or inactive. Inactive rules never fire.
Set initial statuses: Set the status that should be set on the order when the rule has been activated.
Standard mode/Expert mode: Select how the filter should be defined. In standard mode, the filtering mechanism is used to select the orders to which the rule applies. In Expert mode, it is possible to enter code to define the selection of the orders to which the rule applies. Expert mode coding is not covered here.
Standard mode
A filter is a limitation to narrow down the situation when a mail sending rule should fire. A filter consists of the following:
Field: A field from the database that contains information about the order. Fields that are available for filtering are subject to configuration.
Operator: Defines a way to compare the value of the Field to the value in the Value field. I.e it could be larger than, equals, does not equal etc.
Value: The actual value to which the content of the Field compares. Depending on the nature of the field, there could be different value presented in the dropdown list of the Value field. In some cases, multiple values can also be applied which enables the filter to look for more than one value to find out if there is a match.
The + and the X signs are used to add multiple filter lines or delete filter lines.
Logical is an operator that connects multiple filter lines. It can be either “And” or “Or”. “And” means that all lines must be true while “Or” indicates that either one or more lines must be true for the rule to fire.
Actions
Actions are the actual actions performed by ADPOINT when a rule fires. You can add as many actions as you wish, but usual 1-3 actions suffice most conditions.
Each Action is defined with the following fields:
Days: How many days before the deadline (defined above) should the action take place. A day is a full day of 24 hours.
Hours: How many days before the deadline (defined above) should the action take place.
Minutes: How many minutes before the deadline (defined above) should the action take place.
Example: If days is set to 2, hours is set to 6 and minutes set to 30, then the action takes place 2×24 + 6 = 54 hours + 30 minutes before the chosen deadline.
Template: A list of email templates that are available.
Set status: The status to set after the action takes place.
To add an action, click the Add Action button.
To edit an action, click the pencil next to the action.
To delete an action, click the red X next to the action.
Exceptions
Exceptions make it possible to prevent a rule from firing even if criteria for firing are met. This is useful if i.e. a single customer should be excluded from a rule. In that case, the customer can be defined an exception allowing the rule to fire for all customers but the one defined as an exception.

To add an exception, click the Add Exception button.
To edit an exception, click the pencil next to the action.
To delete an exception, click the red X next to the action.
Each exception should have a descriptive name.
A filter can be defined, and it works just as for actions but the result of the filter is “subtracted” from the result of the rule filter.
When the exception filter is applied all orders that are found by the exception filter will be handled in accordance with the exception.
Material request: When set, the exception will send a material request in accordance with the settings below. If not set, no material is sent and the exception will simply leave orders found in the exception filter out of the mail sending rule.
Frequency: The time interval for sending mails in accordance with the exception.
Time: The time of date (according to the timezone of the ADPOINT server) when the mail should be sent.
Template: A list of email templates that are available.
Set status: The status to set after the action takes place.
Look ahead day(s): The number of days the rule should look ahead to include orders. If i.e. the look ahead is set to 7 days, the email (if set) will include orders where the deadline (ad defined for the mail sending rule) lies within 7 days from the day the rule was fired.
Creative mappings
Creative mappings only applies to digital creatives and it is a ruleset that translates internal material specification descriptions into values used by ADPOINT to define size (width and height) as well as a target. A target is a routing point to which the order and creative will be directed downstream in the workflow.

To add a creative mapping, click the + button.
To edit a creative mapping, enter a new value in (one of) the field(s).
To delete a creative mapping, click the red X next to the creative mapping.
To save a creative mapping, press the check mark next to the creative mapping.
Field: Select a fieldname to impact on the creative mapping from the list.
Operator: Defines a way to compare the value of the Field to the value in the Value field. I.e it could be larger than, equals, does not equal etc.
Value: Enter the value to compare to.
Logical: Select an operator that connects multiple filter lines. It can be either “And” or “Or”. “And” means that all lines must be true while “Or” indicates that either one or more lines must be true for the rule to be active.
Width: Enter the value to be assigned to the width of the material specification.
Height: Enter the value to be assigned to the height of the material specification.
Target: Width: Enter the value to be assigned to the target of the material specification.
To add an extra set of properties for the mapping rule, click the + sign. This way multiple rules can be assigned to the same definition of Width, Height and Target.
Validation
Validation is the process of testing (validating) creatives when they are uploaded to ADPOINT.
A validation profile is a list of the tests to be carried out. This can be compared with a checklist of tests.
A validation filter is a rule that is used to determine which validation profile should be applied depending on a number of properties of the order or the creative. This way, ADPOINT can automatically choose the correct Validation profile depending on the nature of the creative. In other words, ADPOINT can apply different test depending on the creative type, the customer preference, the publication and many more options.
Validation filters
Validation filters are used to select the orders to which a certain validation profile should apply.

There are a set of validation filters for Digital and Print respectively. These can be selected by the Tab above the list of validation filters.
To add a validation filter, click the + button.
To edit a validation filter, enter a new value in (one of) the field(s).
To delete a validation filter, click the red X next to the creative mapping.
To save a validation filter, press the check mark next to the creative mapping.
Field: Select a fieldname to impact on the creative mapping from the list.
Operator: Defines a way to compare the value of the Field to the value in the Value field. I.e it could be larger than, equals, does not equal etc.
Value: Enter the value to compare to.
Logical: Select an operator that connects multiple filter lines. It can be either “And” or “Or”. “And” means that all lines must be true while “Or” indicates that either one or more lines must be true for the rule to be active.
Profile: Select the validation profile that this filter should apply to.
To add an extra set of properties for the mapping rule, click the + sign. This way multiple rules can be assigned to the same definition of Width, Height and Target.
Validation profiles
Validation profiles consists of a number of checkpoint that ADPOINT validates. The result of a validation is displayed in the validation report which can be accessed in the Summary and Validation panels.

The following applies to the definition of validation profiles for digital creatives only. Validation profiles for print creatives are defined in a separate application and covered elsewhere.
To add a validation profile, click the CREATE NEW VALIDATION PROFILE button.
To delete a validation filter, click the red X next to the creative mapping.
To duplicate a validation filter as a child profile, click circle with a plus sign. Enter the name of the child profile in the name field.
Child profiles are separate profiles that are connected to a main profile. If a property is changed in the main profile, the change is also applied to the child profile.
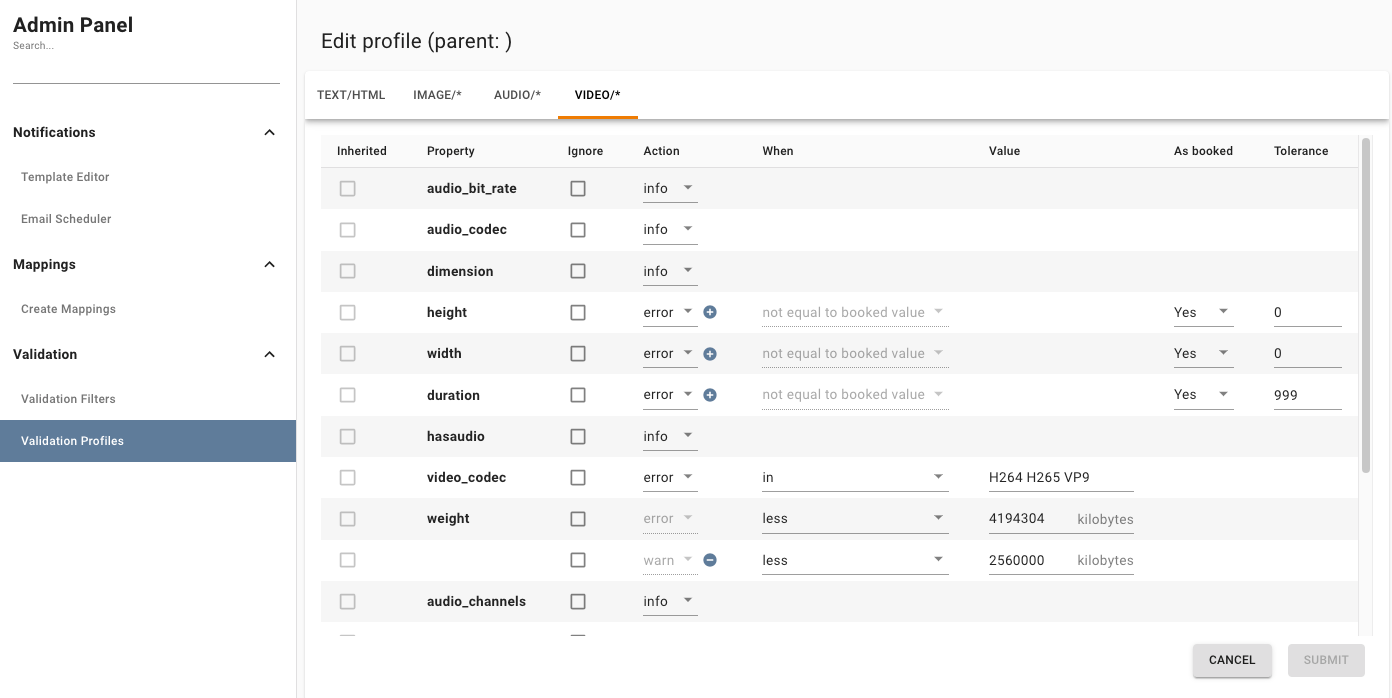
The profile is split into 4 sections - shown as tabs above the properties:
Text/HTML: Contains properties that are defined as text.
Image: Contains properties that relate to images
Audio: Contains properties that relate to sound
Video: Contains properties that relate to video.
Defining the validation
Under each section, the properties that can be validated are listed. For each property, the level of validation can be defined.
Inherited: If checked, this means that the validation is inherited from the parent profile.
Property: The name of the property. This cannot be changed.
Ignore: If checked, the property will not be validated
Action: Select how the validation should appear in the validation report.
Error: If the validation fails, the result will be flagged as an error.
Warn: If the validation fails, the result will be flagged as a warning.
Info: The result will be listed as information regardless of the outcome of the validation.
When: A list of operators that determine how the result compares to the value.
Value: The value the validation result compares to.
As booked: If checked, the validation result is compared with the booked value.
Tolerance: A value to indicate a range in which the validation result can be without being recognized as an error.
Press SUBMIT to save the profile.